12 minutes
How to Run Big Models on Small GPUs | All about Quantization
Originally published on Substack, Nov 26, 2025
You’ve trained or fine-tuned a powerful LLM. It’s smart, it works, and it’s 51 GB. Now you need to deploy it on a 24GB GPU, or distribute it to users who don’t have data center hardware. Suddenly, that beautiful model doesn’t fit anywhere useful. This is the quantization problem, and it’s increasingly unavoidable.
Quantization is how we make big models fit on small GPUs. It’s like image compression for neural networks: a RAW photo might be 50MB, but compress it to JPEG and it’s 5MB. You lose detail, but to most people, it looks the same. A 50GB model becomes 13GB. A model that needed 80GB of VRAM (A100 territory) now runs on 24GB (like an RTX 3090 or 4090).

The technique typically focuses on compressing the weights (the learned parameters stored in the model). Activations (the data flowing through the network during inference) are usually kept at higher precision to preserve quality. This is why you’ll see formats like “W4A16” (4-bit weights, 16-bit activations): the storage is compressed, but the math stays accurate.
Whether you’re deploying on edge devices, shipping to customers with consumer hardware, or just trying to run more models per server, understanding quantization is what separates hobbyist experiments from production systems.
Note: Quantization reduces model size and memory usage. It doesn’t affect context length, token limits, or prompt optimization (those are separate concerns).
The core trade-off is simple: you give up some numerical precision in exchange for big wins in memory and speed. Done well, quality loss is small. Done poorly, the model becomes unreliable. This guide shows you how to do it well.
When Quantization Happens: Two Paths
There are two main points where quantization shows up in a model’s life cycle. Most of you want the second one.
1. Quantization-Aware Training (QAT) (During Training)
The model is trained or fine-tuned while simulating low-precision arithmetic, so it “learns around” quantization noise from the start.
Use this when:
- You’re training from scratch or doing large, heavy fine-tunes
- Training-time memory is the bottleneck
- You need the absolute best quality from a quantized model
Trade-offs:
- More complex to set up and tune
- Slower training
- Requires changing your training pipeline
Who uses this: Research labs and companies training foundation models (OpenAI, Meta AI, or large research institutions doing pretraining or continued pretraining at scale), as well as hardware manufacturers (NVIDIA, Intel, Groq) showcasing optimized performance on their chips. If you’re not training very large models or doing heavy-scale fine-tuning, you likely don’t need this. For practical deployment, post-training quantization has caught up in quality.
2. Post-Training Quantization (PTQ) (After Training)
This is what almost everyone does: you take a trained FP16 model and compress it for deployment.
Use this when:
- You already have a trained model
- You need it to fit on smaller GPUs or be distributed to users with varied hardware
- You’re moving from a training box (A100) to inference hardware (e.g., 3090, 4090, L4)
Trade-offs:
- Much simpler and faster to run
- No changes to the training pipeline
- Slightly more quality loss vs QAT, but modern methods make this negligible for most applications
Who uses this: Essentially everyone else. Individual developers deploying open-source models, startups building on Llama or Mistral, teams fine-tuning models for production, companies distributing models to customers with consumer hardware, and anyone running inference servers. The rest of this guide focuses on PTQ.
🎯 Default Recipe
Want to quantize your model without getting in the option details? Here’s the setup that works for most production deployments:
Method and precision:
- Use AWQ W4A16 (4-bit weights, 16-bit activations)
During quantization:
- Use domain-specific calibration data (128–512 samples) because the quantization process learns from how your model behaves on real inputs
- Run quantization in an isolated environment (separate from your inference setup)
After quantization:
- Test immediately with real prompts to verify quality
- Start with a fresh GPU state (no other processes using VRAM) before serving
This balances quality, speed, and compatibility for most production deployments.
Don’t know what AWQ or W4A16 means yet? Keep reading (we’ll explain the methods and precision levels in the next section).
How Post-Training Quantization Works
Step 1: Prepare Your Environment
Set up your quantization tools in an isolated environment. The quantization process requires:
- A quantization library (tools like llm-compressor, AutoGPTQ, or AutoAWQ that perform the actual compression)
- PyTorch (the deep learning framework your model runs on; version compatibility matters)
You’ll also need an inference framework (serving tools like vLLM or transformers) to test your quantized model afterward, but keep that separate.
Best practice: Use separate virtual environments for quantization and inference. Version mismatches cause cryptic errors; isolate them.
Step 2: Gather Calibration Data
Most modern quantization methods are “data-aware” (they run sample inputs through your model during quantization to observe how it actually behaves, then use that information to decide which weights are most important to preserve). 128–512 examples is usually enough.
What makes good calibration data:
- Representative of your actual use case
- Covers the range of input lengths you’ll see
- Includes diverse examples (not just easy or hard cases)
Common mistake: Using generic calibration data (like random Wikipedia samples) for a specialized model. If your model processes legal documents, calibrate with legal text.
Step 3: Choose Your Quantization Method
These are different mathematical approaches for compressing your model. Each uses different algorithms to decide how to reduce precision while preserving quality.
The three most widely used methods for production deployment are:
AWQ (Activation-Aware Weight Quantization)
- Uses calibration data to identify which weights are most critical
- Protects important weights with higher precision
- Generally produces higher-quality models
- Faster inference, especially with optimized loaders like vLLM
- Newer, so some edge cases might have compatibility issues
GPTQ (Gradient Post-Training Quantization)
- More mature ecosystem with broader model support
- Slightly simpler to apply
- Can be a bit slower at inference
- More reliable fallback for unusual architectures
GGUF (llama.cpp format)
- The standard for Apple Silicon (MacBooks) and CPU-based inference
- Most popular format for hobbyists and local testing
- Supports mixed-mode inference (offloading layers to GPU when available)
- Different toolchain from AWQ/GPTQ (uses llama.cpp ecosystem)
Note: GGUF is not a quantization method like AWQ/GPTQ (it’s a file format that incorporates its own quantization approaches).
Other techniques exist (like bitsandbytes, QLoRA for training, and proprietary vendor solutions), but AWQ, GPTQ, and GGUF cover the vast majority of real-world deployment use cases.
General recommendation: AWQ and GPTQ both target GPU inference and work with frameworks like vLLM. GGUF is the standard for CPU/Apple Silicon and mixed-mode inference, but usually less performant than AWQ/GPTQ for pure server-grade GPU setups. For GPU server deployment, start with AWQ. For local/edge devices and Apple hardware, use GGUF. Fall back to GPTQ if you encounter compatibility issues with AWQ.
Step 4: Configure Quantization Parameters
Once you’ve chosen a method (AWQ, GPTQ, or GGUF), you need to decide how much to compress. The notation describes how many bits are used for weights (W) and activations (A). Fewer bits means less memory and faster inference, but can reduce quality if pushed too far.
Common precision options:
- W4A16 (4-bit weights, 16-bit activations): Maximum compression, ~75% size reduction
- W8A16 (8-bit weights, 16-bit activations): More conservative, ~50% size reduction
- W8A8 (8-bit weights, 8-bit activations): Full 8-bit quantization, requires special techniques like SmoothQuant
Default to W4A16
This is the current sweet spot for most deployments. Use W8A16 (8-bit weight-only) when W4A16 causes unacceptable quality loss or you need maximum fidelity.
The “A16” part is crucial: it means the actual calculations during inference still happen in 16-bit floating point (FP16, the same precision used in training), keeping the model’s reasoning intact while only the stored weights are compressed.
Quick Reference: Quantization Trade-offs
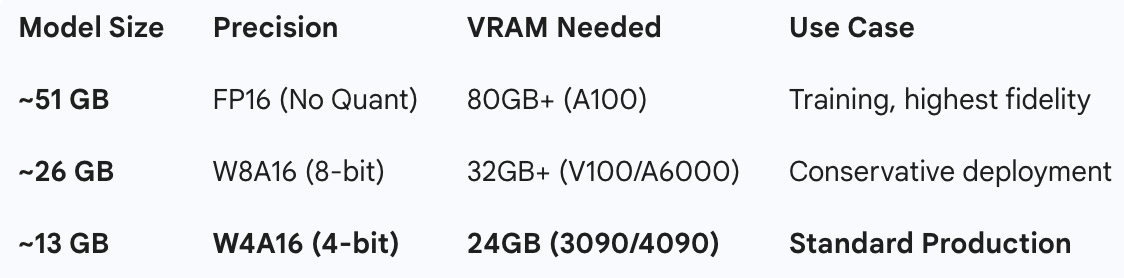
Why W4A16 is the sweet spot:
- ~75% size reduction vs FP16
- Minimal quality loss with good calibration
- Well supported by modern inference engines (vLLM, exllama-style loaders)
- Fastest inference with optimized loaders
When to use W8A16 instead:
- W4A16 produces noticeable quality degradation
- You have more VRAM available and want maximum fidelity
- Working with a model architecture that’s sensitive to aggressive quantization
Note: True 8-bit quantization (W8A8, where both weights and activations are 8-bit) is different and often requires techniques like SmoothQuant to maintain quality. Most practical deployments use W4A16 or W8A16.
Step 5: Run Quantization
The actual quantization process involves:
- Loading your model (happens in full precision initially)
- Running calibration samples through the model to measure activation patterns
- Analyzing which weights are most sensitive to precision loss
- Converting weights to lower precision with appropriate scaling factors
- Saving the quantized model and all configuration files
Time expectation: On the order of tens of minutes for a 7–13B model on a single GPU, depending on calibration sample count and your hardware.
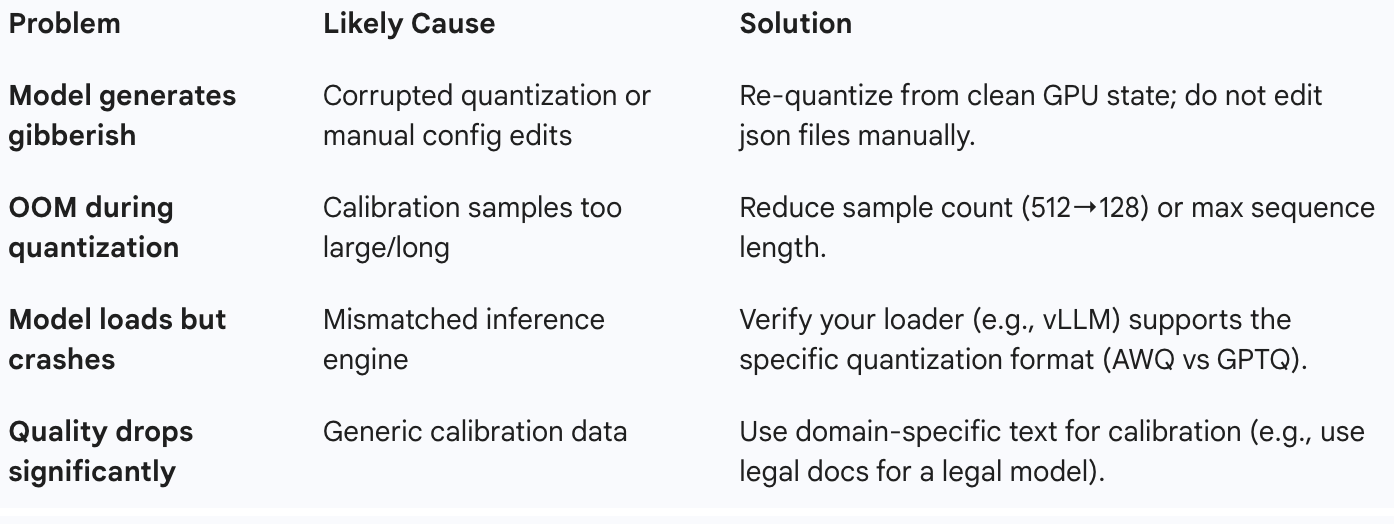
Common failure mode: Out of Memory during quantization
If quantization itself runs out of memory:
- Reduce calibration sample count (512 → 256 → 128)
- Lower the maximum sequence length during calibration
- Ensure no other processes are using GPU memory
- Try a smaller batch size for calibration
Step 6: Validate Your Quantized Model
Never skip validation. Run your domain-specific test cases and compare outputs between the original and quantized models.
What to test:
- Factual accuracy on known questions
- Reasoning quality on multi-step problems
- Output formatting and structure
- Edge cases specific to your domain
Warning sign: If your quantized model produces noticeably worse outputs, you likely have corrupted quantization (re-run from clean state), insufficient calibration data, or a model architecture that doesn’t quantize well with your chosen method.
Best Practices from Real-World Deployment
Configuration Management is Critical
Your quantized model needs several configuration files which are automatically generated by the quantization tool when you run the process.
- config.json (main model config)
- Quantization-specific config files (naming varies by tool: quantize_config.json, quant_config.json, or similar)
- All tokenizer files
Don’t manually edit quantization configs after they’re generated. Manual edits are the leading cause of corrupted quantized models. Only edit when fixing a specific, documented issue with a known solution.
Save everything: When you get a quantization working well, save not just the weights but all configs, the quantization script, and notes on what worked.
Test Immediately After Quantization
Run a quick inference test right after quantization completes, before doing anything else. This catches corrupted quantization processes, missing configuration files, and incompatible format issues immediately rather than hours later.
When Standard Methods Don’t Work
As models evolve with new architectures and design choices, you’ll occasionally hit edge cases where standard quantization produces poor results. This is common when working with bleeding-edge models where the quantization frameworks haven’t quite caught up yet.
Example: Stacking SmoothQuant + GPTQ In rare cases where a model has extreme activation outliers or an unusual architecture that breaks standard AWQ/GPTQ, you might need to get creative.
- First pass: Apply SmoothQuant to normalize activation distributions.
- Second pass: Apply GPTQ for 4-bit weight quantization.
Context: This is not a standard workflow. It is a complex, custom intervention for when “out of the box” tools fail. Your specific solution will depend entirely on why the standard method failed (e.g., activation spikes vs. layer incompatibilities). Note, a more complex pipeline, longer quantization time, and you’re venturing into less-tested territory.
When to experiment with this:
- Standard AWQ and GPTQ both produce unacceptable quality loss.
- You’re working with a newly released architecture (Day 0–30 of release).
- Your model has known structural quirks (like specific normalization layers) that don’t play nice with standard kernels.
The Reality Check: The quantization landscape changes weekly. If you hit a wall, don’t bang your head against standard scripts. Search for recent papers or GitHub issues specific to that model architecture. Sometimes the solution isn’t a new tool, but a weird combination of existing ones.
Common Pitfalls and How to Avoid Them
Decision Framework
1. Do you need quantization at all?
- Target GPU comfortably fits your model → No quantization needed
- Deployment hardware is constrained → Yes, quantize
2. Which stage to quantize?
- Training from scratch with tight memory → Quantization-aware training (rare)
- Deploying existing model → Post-training quantization (this is you 95% of the time)
3. Which method?
- GPU server deployment + want best quality → AWQ W4A16
- Local/edge devices or Apple Silicon → GGUF
- Need maximum compatibility → GPTQ
- Conservative approach → 8-bit weight-only
4. Does it work?
- Test immediately with domain-specific prompts
- If quality is poor → Check configs, try different calibration data, consider combining methods
Measuring Success
Quantization isn’t just about shrinking file size; it’s about deployment viability. To do this right, this section really needs a deeper dive outside this post. Proper evaluation is a massive topic that deserves its own guide, but to start understanding the trade-offs at a high level, evaluate your success across four dimensions:
- Memory efficiency: Did you hit your target GPU VRAM usage?
- Inference speed: Real requests per second, not theoretical throughput
- Quality retention: Task-specific accuracy, not just perplexity
- Stability: Does it run reliably for hours without crashes?
The best quantized model balances all four. Don’t chase the smallest possible file size at the cost of reliability. If a specific quantization method degrades your model’s reasoning, step back up to a higher precision.
Final Thoughts
Quantization has moved from an optional optimization to a deployment requirement. But treating it as a simple “compress” button is a mistake. The real work happens in the details: curating the right calibration data, isolating your environments, and knowing exactly when a 4-bit model is “good enough” versus when it’s broken.
Don’t just chase the smallest file size. Focus on the engineering reality. Test your approach on your specific use case, keep clean configurations and reproducible processes, validate thoroughly and have a fallback plan when needed. The goal isn’t just to make the model fit on a GPU; it’s to maintain the intelligence you worked so hard to train.
Ultimately, quantization is about accessibility. It allows you to take massive, sophisticated models and put them into production where they actually add value. When you can successfully quantize, you stop worrying about hardware constraints and start focusing on what your model can actually do.
Glossary
- AWQ: Activation-Aware Weight Quantization
- GPTQ: Gradient Post-Training Quantization
- GGUF: llama.cpp quantization format for CPU/Apple Silicon
- QAT: Quantization-Aware Training (during training)
- PTQ: Post-Training Quantization (after training)
- SmoothQuant: Technique for normalizing activation distributions before quantization
- W4A16: 4-bit weights, 16-bit activations
$ cd /posts/ — all posts